If you have ever wanted a still character to move exactly like a clip you already have, this motion control AI tutorial is the shortcut. Instead of keyframing by hand, you hand the model two things — a picture and a motion video — and it does the choreography. I have run hundreds of these jobs, and the gap between a clean result and a melted face almost always comes down to setup, not luck.
This guide walks through the whole loop: what motion control AI actually does under the hood, the exact steps to make your first clip, which settings matter, and the mistakes that quietly ruin results.
What motion control AI actually does
Motion control AI (also called motion transfer AI) takes the movement from a driving video and maps it onto a reference image, producing a new clip where your still subject moves like the person in the driving footage — while keeping its own face, outfit, and style.
Under the hood it is not magic, it is a three-step pipeline. First the system reads the driving video frame by frame and extracts keypoints — joints, body pose, and face landmarks — into a compact "motion trajectory." Then it binds that trajectory to the subject in your reference image so identity stays put while the pose changes. Finally a video model synthesizes new frames that follow the trajectory. Academic work formalizes this exact recipe: transferring motion dynamics from a driving video to a source image via keypoint trajectories, then decoding to video with a motion-conditioned generator. Newer research pushes the same idea further with latent trajectory guidance and adaptive transfer across arbitrary objects.
The practical takeaway for this motion control AI tutorial: the model only knows the motion it can see. Clear keypoints in, clean animation out.
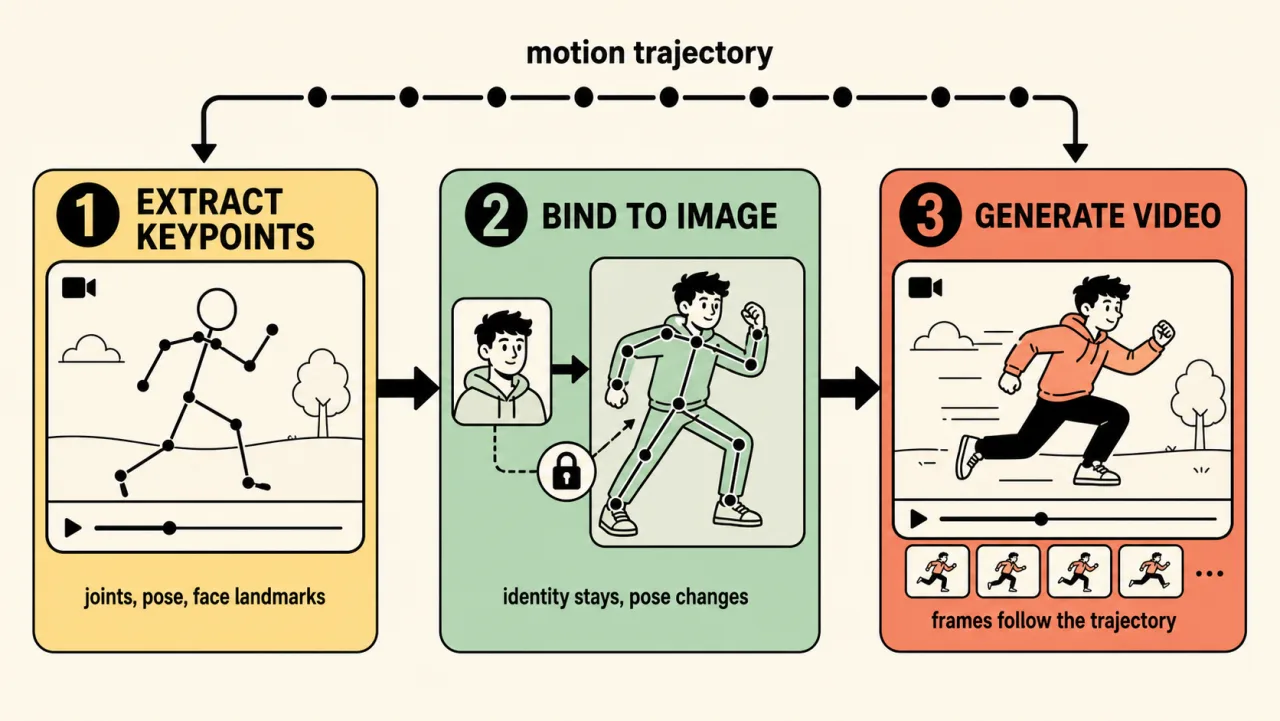
The three-step pipeline: extract keypoints from the driving video, bind them to your reference image, then generate frames that follow the trajectory.
What you need before you start
You need exactly two assets and a couple of decisions:
- A reference image — the character you want to animate. Full-body or upper-body, single subject, clear face.
- A driving (motion) video — the clip whose movement you want to copy. Short, single subject, steady framing.
- An orientation choice — whether your output follows the video's length or a shorter image-led clip.
- A resolution — 720p for drafts, 1080p for finals.
You do not need editing skills or a GPU. A browser-based video to video AI generator handles the compute. I run my own jobs in the Motion Control AI generator on the homepage: you upload the reference image, upload the motion video, pick orientation and resolution, and it transfers the motion using Kling motion control models. That is the whole interface, which is why it is a good place to follow along.
Step-by-step: your first motion transfer
Here is the core of the motion control AI tutorial — the loop I use every time.
- Pick your subject image. Upload a sharp, well-lit picture with the subject upright and fully visible.
- Upload the driving video. Choose an MP4 or MOV with one clear person moving against a stable background.
- Set the orientation. Match it to your driving clip — video-led for longer motion, image-led for short, tight loops.
- Choose resolution. Render a 720p test first; only commit to 1080p once the motion looks right.
- Generate and review. Watch the face and hands at full speed, not paused — artifacts hide in motion.
- Iterate on inputs, not settings. If it looks wrong, swap the image or trim the video before changing anything else.
That last step is the one most beginners skip. Re-rolling the same bad inputs wastes credits; fixing the inputs fixes the output.
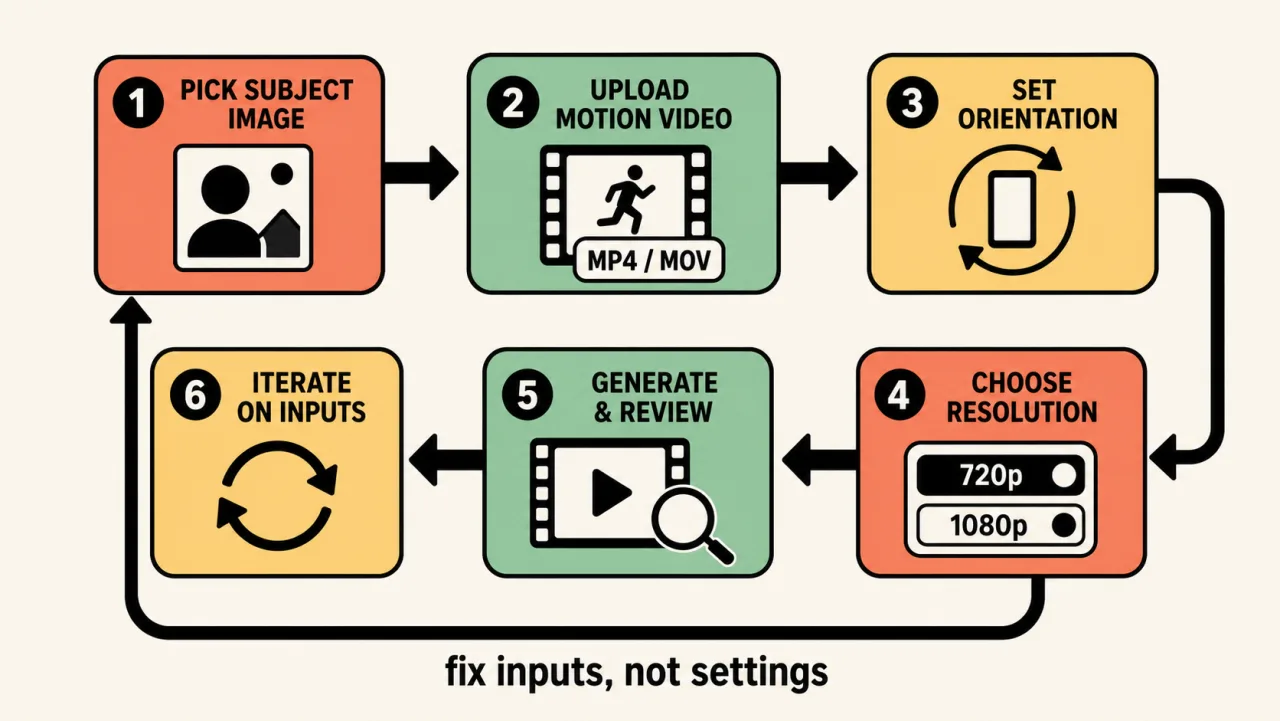
Your first motion transfer in six steps — and when it looks wrong, iterate on the inputs, not the settings.
Choosing settings: orientation, resolution, and model
Settings are where a decent clip becomes a usable one. This is the part of the motion control AI tutorial worth bookmarking.
| Setting | Option A | Option B | When to pick |
|---|---|---|---|
| Resolution | 720p | 1080p | Draft on 720p; final delivery on 1080p |
| Orientation | Video-led | Image-led | Long, complex motion vs. short, framed loops |
| Model | Kling 2.6 | Kling 3.0 | 3.0 when you need background control |
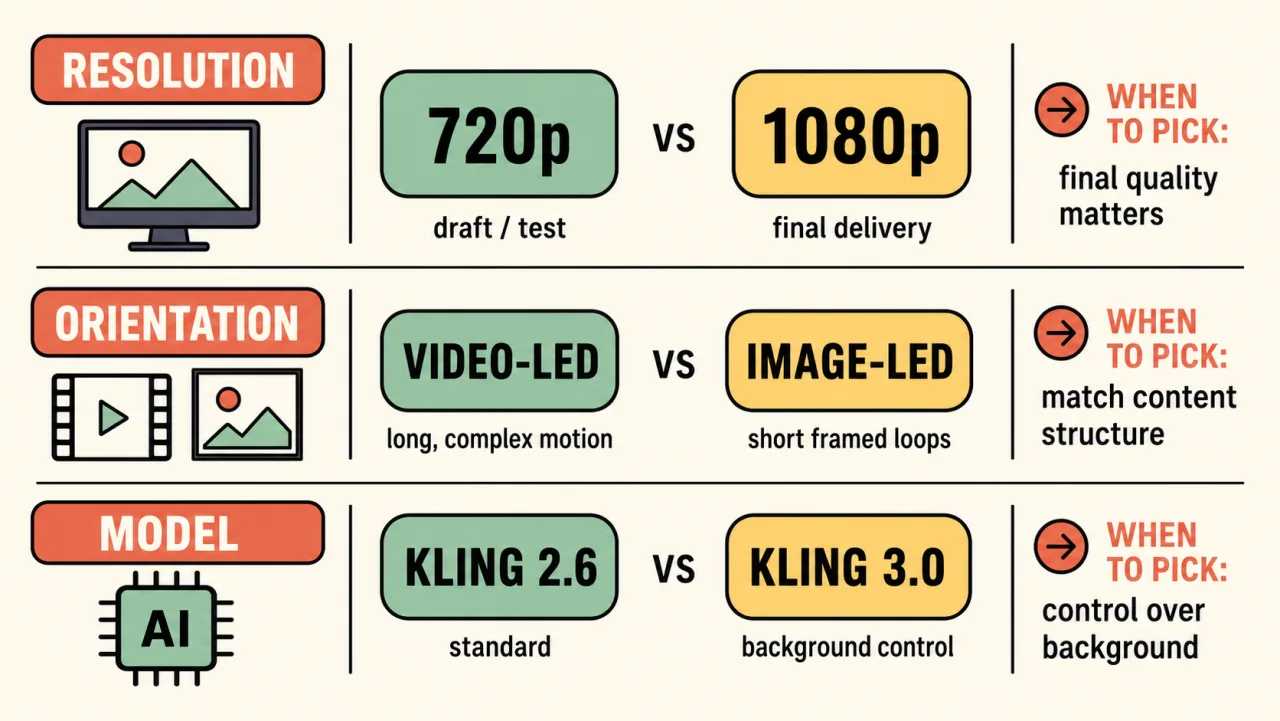
The three settings that matter: resolution, orientation, and model — with when to pick each option.
Two notes from experience. Resolution does not fix motion problems — a shaky transfer at 1080p is just a sharper shaky transfer, so always validate at 720p first. And with Kling motion control, the newer model adds background-source control, which matters when you want the scene, not just the character, to behave. Output length tracks your driving video, so a 12-second clip costs more than a 4-second one; trim ruthlessly.
How to pick a reference image and motion video that actually work
This section is the difference between this motion control AI tutorial and the generic ones. The model's quality ceiling is set by your two inputs.
A strong reference image:
- One subject, no crowd — extra people confuse the binding step.
- Face and body clearly visible and upright (not lying down or upside down).
- Pose roughly compatible with the driving video's starting pose.
- Even lighting; avoid heavy shadow across the face.
A strong driving video:
- A single mover, steady camera, minimal cuts — every cut breaks the motion trajectory.
- Short and deliberate; a few seconds of clean motion beats 30 seconds of noise.
- The body part you care about (hands, face, full body) stays in frame the whole time.
Think of it as casting: the image is who moves, the video is how they move. Mismatched orientation or a half-cropped subject in either one is the single most common reason a result looks "off."
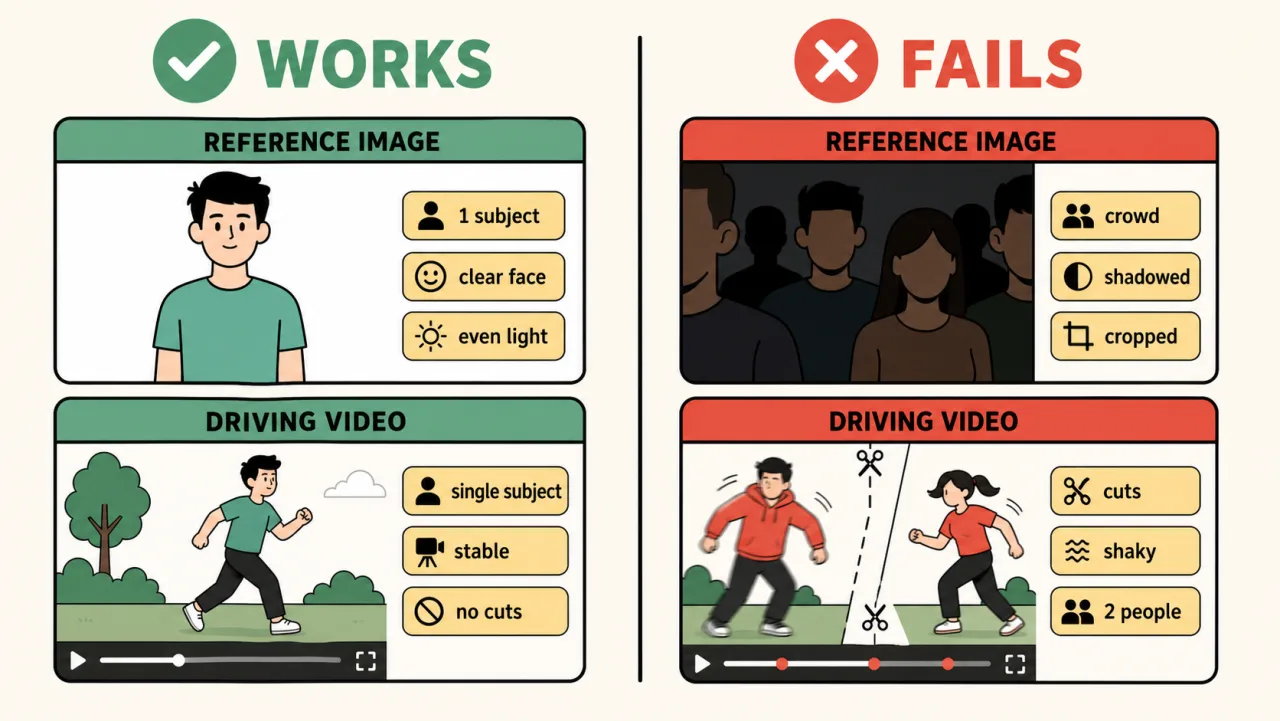
What works vs what fails: a single-subject, well-lit reference image and a steady, cut-free driving video beat crowded, shadowed, or jittery inputs every time.
Common mistakes that ruin a motion transfer
Even with good inputs, a few recurring failure modes show up. Here is how I diagnose them:
- Face warping / identity drift — usually a low-resolution or shadowed reference image. Re-shoot the still, don't re-roll.
- Flicker between frames — often a driving video with cuts or jitter. Use one continuous, stable shot.
- Orientation mismatch — the subject "snaps" oddly because image and video poses disagree. Align starting poses.
- Multi-subject confusion — two people in either asset and the model splits attention. Crop to one.
- Occlusion glitches — hands or face leaving frame in the driving clip. Keep key parts visible throughout.
Nearly all of these trace back to inputs, which is exactly what the research predicts: degrade the keypoint signal and the generator has nothing clean to follow.
Frequently asked questions
Is motion control AI the same as deepfaking?
No. A motion transfer AI tool animates a character you supply using motion you supply; it is choreography, not face-swapping onto someone else's footage. Use it with images and clips you have the rights to.
Do I need video editing experience?
None. A browser-based video to video AI generator handles the rendering. Your only craft is choosing good inputs, which this motion control AI tutorial covers above.
How long can the output be?
Output length generally follows your driving video, within the tool's limits. Shorter, cleaner clips cost fewer credits and almost always look better.
Why does my result look melted or jittery?
Almost always the inputs. Swap in a sharper, single-subject reference image and a steady, cut-free driving video before touching any other setting.
Conclusion
A good motion control AI tutorial is really a lesson in setup: clean keypoints from a steady driving video, a sharp single-subject reference image, matched orientation, and a 720p test before the 1080p final. Get those right and the model does the hard part. When you are ready to try it, upload your two assets to the Motion Control AI generator and run your first transfer — then iterate on inputs, not settings, until it sings.